01 · Concepts common to all screens
Nearly every menu option opens a maintenance screen with the same structure. Once you understand one, you understand them all. This chapter explains that shared structure; subsequent chapters add only what is specific to each screen.
1. Maintenance-screen structure
A typical maintenance screen has two main tabs:
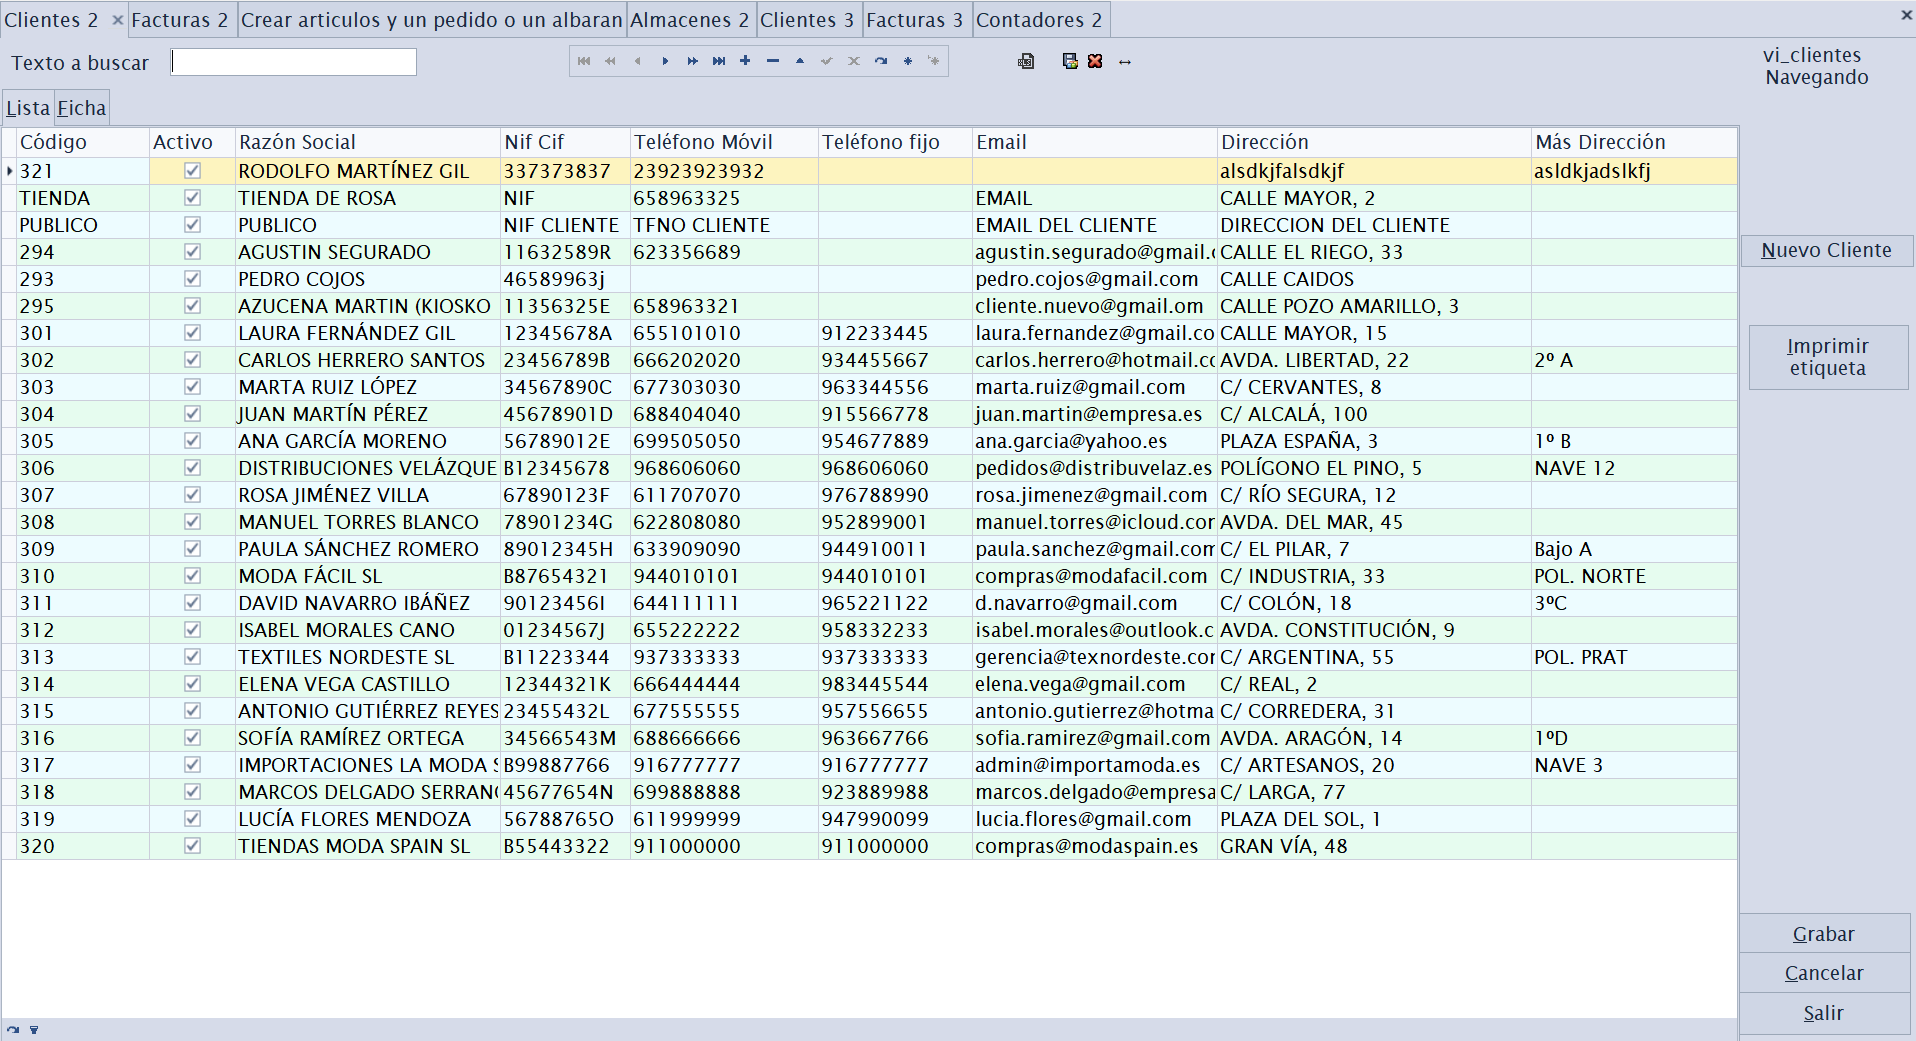
Lista tab
Displays a grid containing all records in the table (customers, items, invoices and so on). From here you can:
- Sort by any column by selecting its heading.
- Group, filter and rearrange columns (DevExpress grid features).
- Search for text in the grid.
- Double-click a row to open its Ficha.
Saving the grid layout
You can customise the grid (visible columns, order, width, sorting and grouping) and save it for future use. These shortcuts, and their equivalent buttons above the grid, control it:
| Shortcut | Action | Effect |
|---|---|---|
[Alt]+[F12] | Guardar layout | Saves the current grid layout. A dialog asks you to select the scope of the save (see below). |
[Ctrl]+[F12] | Resetear layout | Deletes the saved customisation and restores the default layout. It also asks for the scope (whose layout is reset). |
[Ctrl]+[F10] | Ajustar anchos | Automatically fits column widths to their contents (best fit). This is local and is not saved until you press [Alt]+[F12]. |
Save scope (the dialog's «Permiso» field). When saving or resetting, the dialog lets you choose who is affected by the change:
| Option | Scope |
|---|---|
| Usuario (default) | Only you. This is your customised view; other users do not see it. |
| Grupo | All users in your permissions group (for example, Cajeros). Useful for setting a standard team view. |
| Todos | All application users. Available only if you are an administrator (root group). |
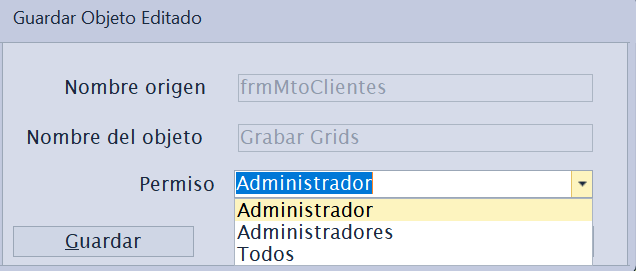
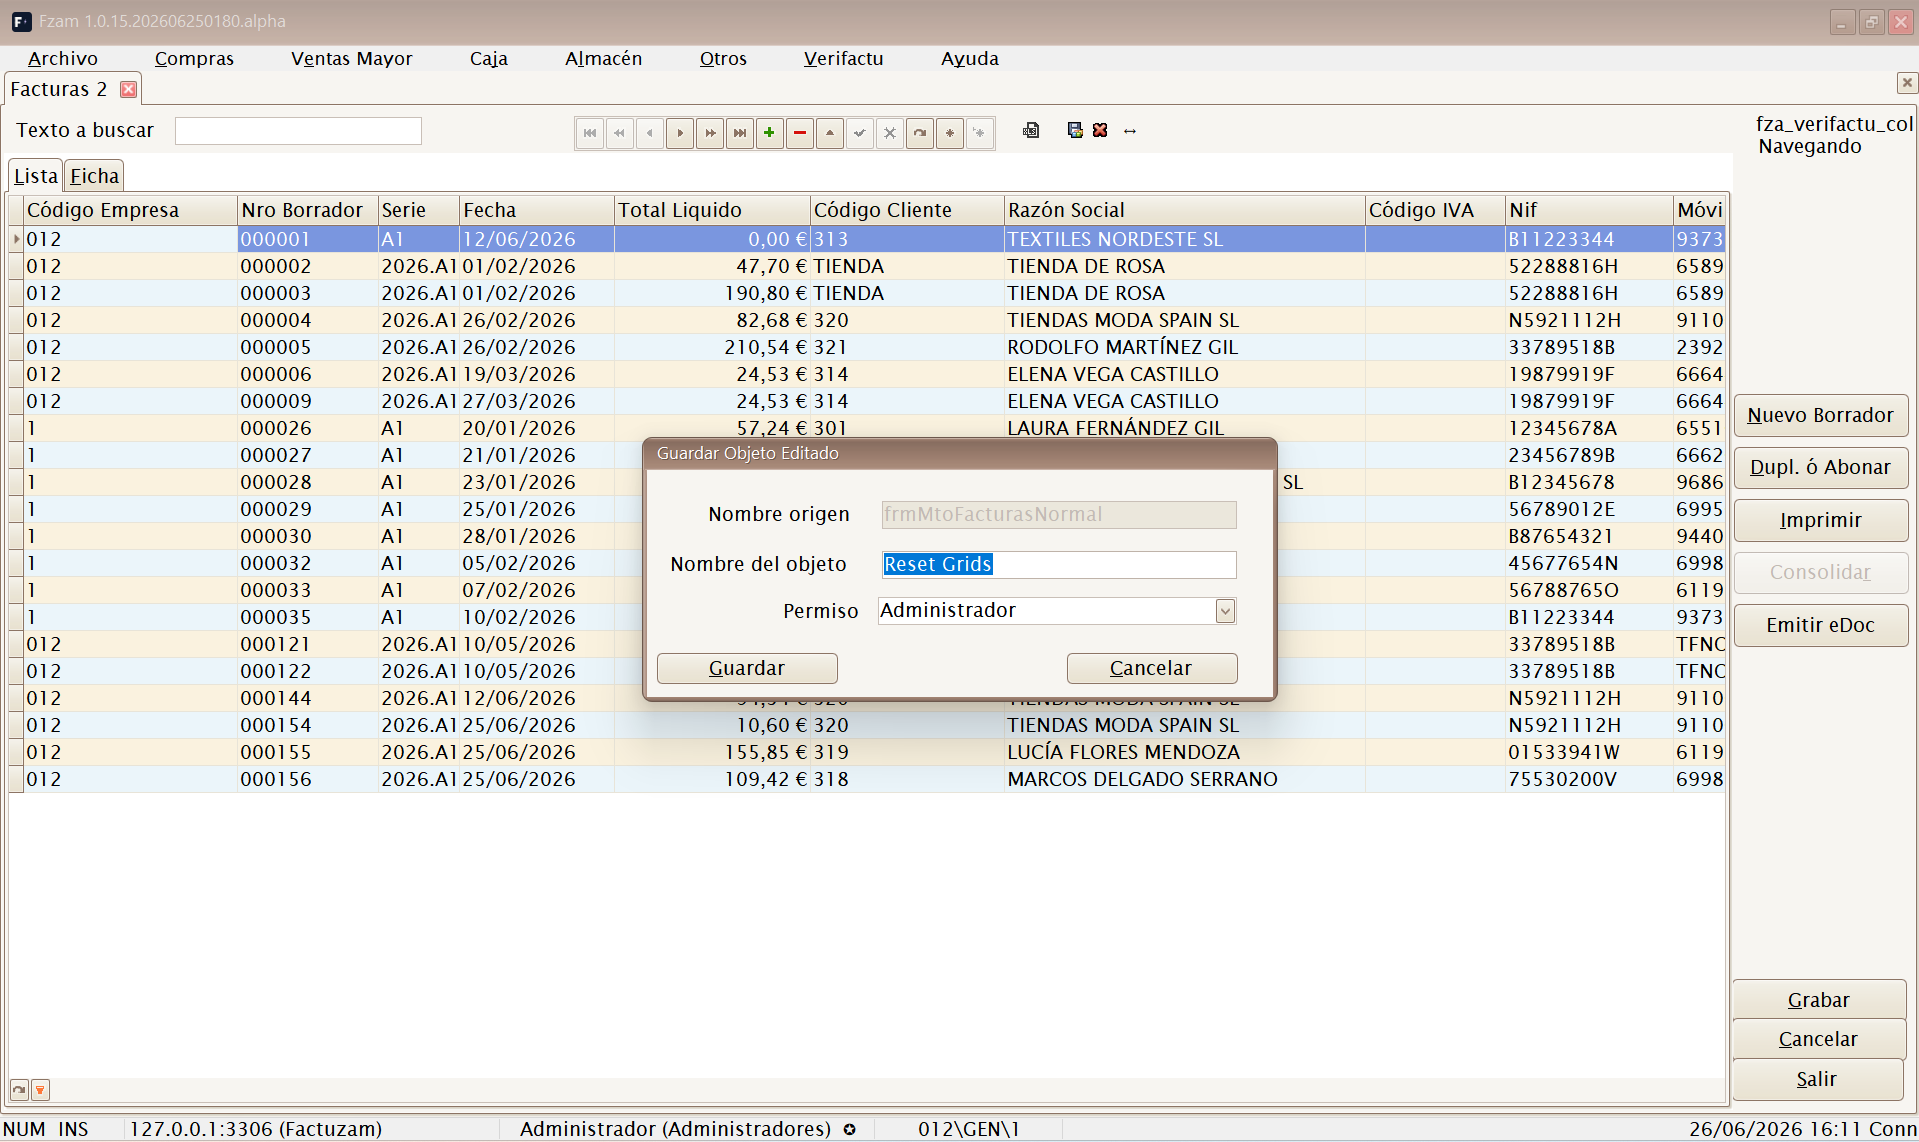
By default, the layout is saved only for your user, so you can adjust your grid without affecting anyone else. Choose Grupo or Todos only when you want to impose the same view on more people; remember that Todos overwrites every user's layout and is available only to an administrator.
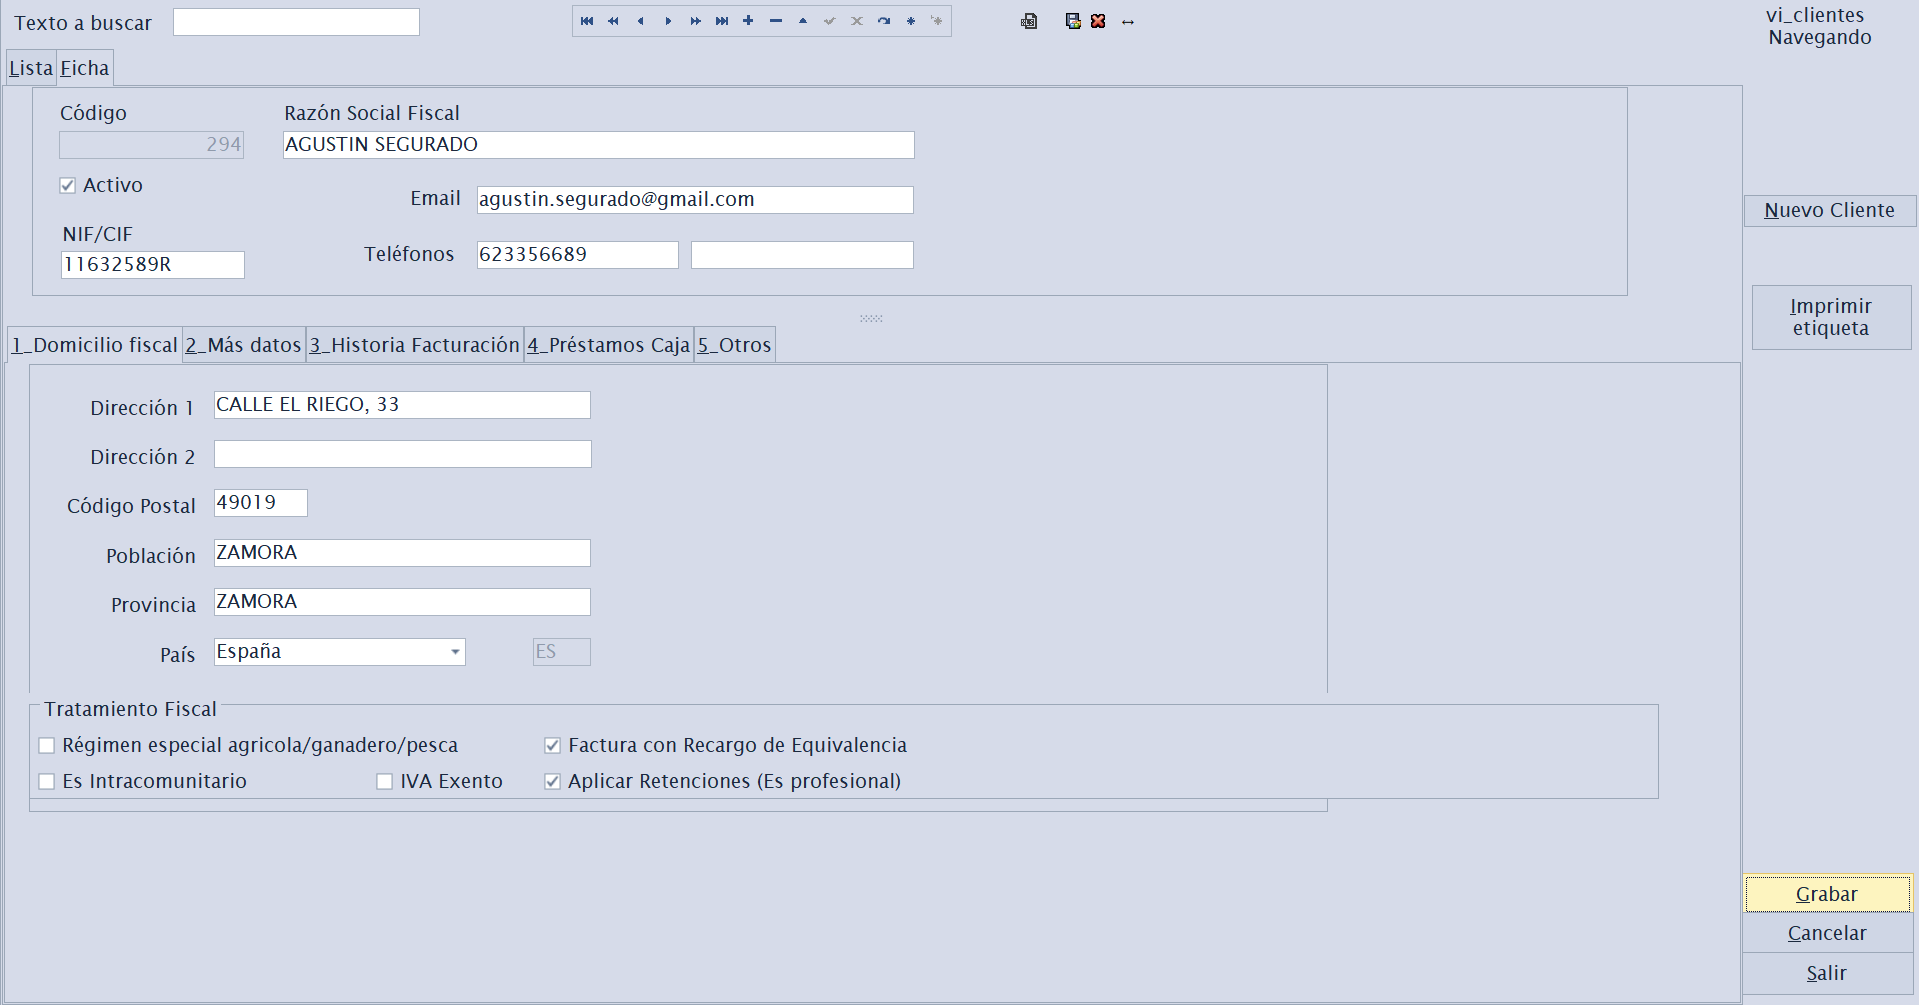
Ficha tab
Displays the details of one record, with all its fields arranged in sub-tabs (Datos principales, Más datos and so on). This is where an individual record is created, viewed and edited.
Some screens also have a Perfil tab (visible only to administrators) for configuring columns, captions and the screen's behaviour by user/profile.
2. Record navigator
At the bottom or side of the screen is a navigation bar containing the standard buttons. Their actions are always the same:

| Button | Shortcut | Action |
|---|---|---|
| Primer registro | [Ctrl]+[Inicio] | Goes to the first record in the list (respecting the grid sort order). |
| Registro anterior | [RePág] | Goes back one record. |
| Registro siguiente | [AvPág] | Advances one record. |
| Último registro | [Ctrl]+[Fin] | Goes to the last record in the list (respecting the grid sort order). |
| Insertar registro | [Insert] | Creates a new blank record for completion. |
| Editar registro | [F2] | Puts the current record into edit mode. |
| Eliminar registro | [Ctrl]+[Supr] | Deletes the current record (after confirmation). |
| Grabar registro | [F12] | Confirms and saves changes to the database. |
| Retroceder bloque | [Ctrl]+[RePág] | Moves back one block of records (pagination). |
| Avanzar bloque | [Ctrl]+[AvPág] | Advances one block of records (pagination). |
Additional buttons appear for items and documents:
| Button | Shortcut | Action |
|---|---|---|
| Foto artículo | [Ctrl]+[F] | Displays the item photograph. |
| Consulta stock | [Ctrl]+[U] | Opens the stock enquiry for the current item. |
| Búsqueda de datos | [Ctrl]+[E] | Opens the advanced item and SKU search (see below). |
Navigator shortcuts work when the maintenance screen has focus. Grabar has two equivalent shortcuts:
[F12](the navigator's Grabar registro button) and[Alt]+[G](the Grabar action button; see below).
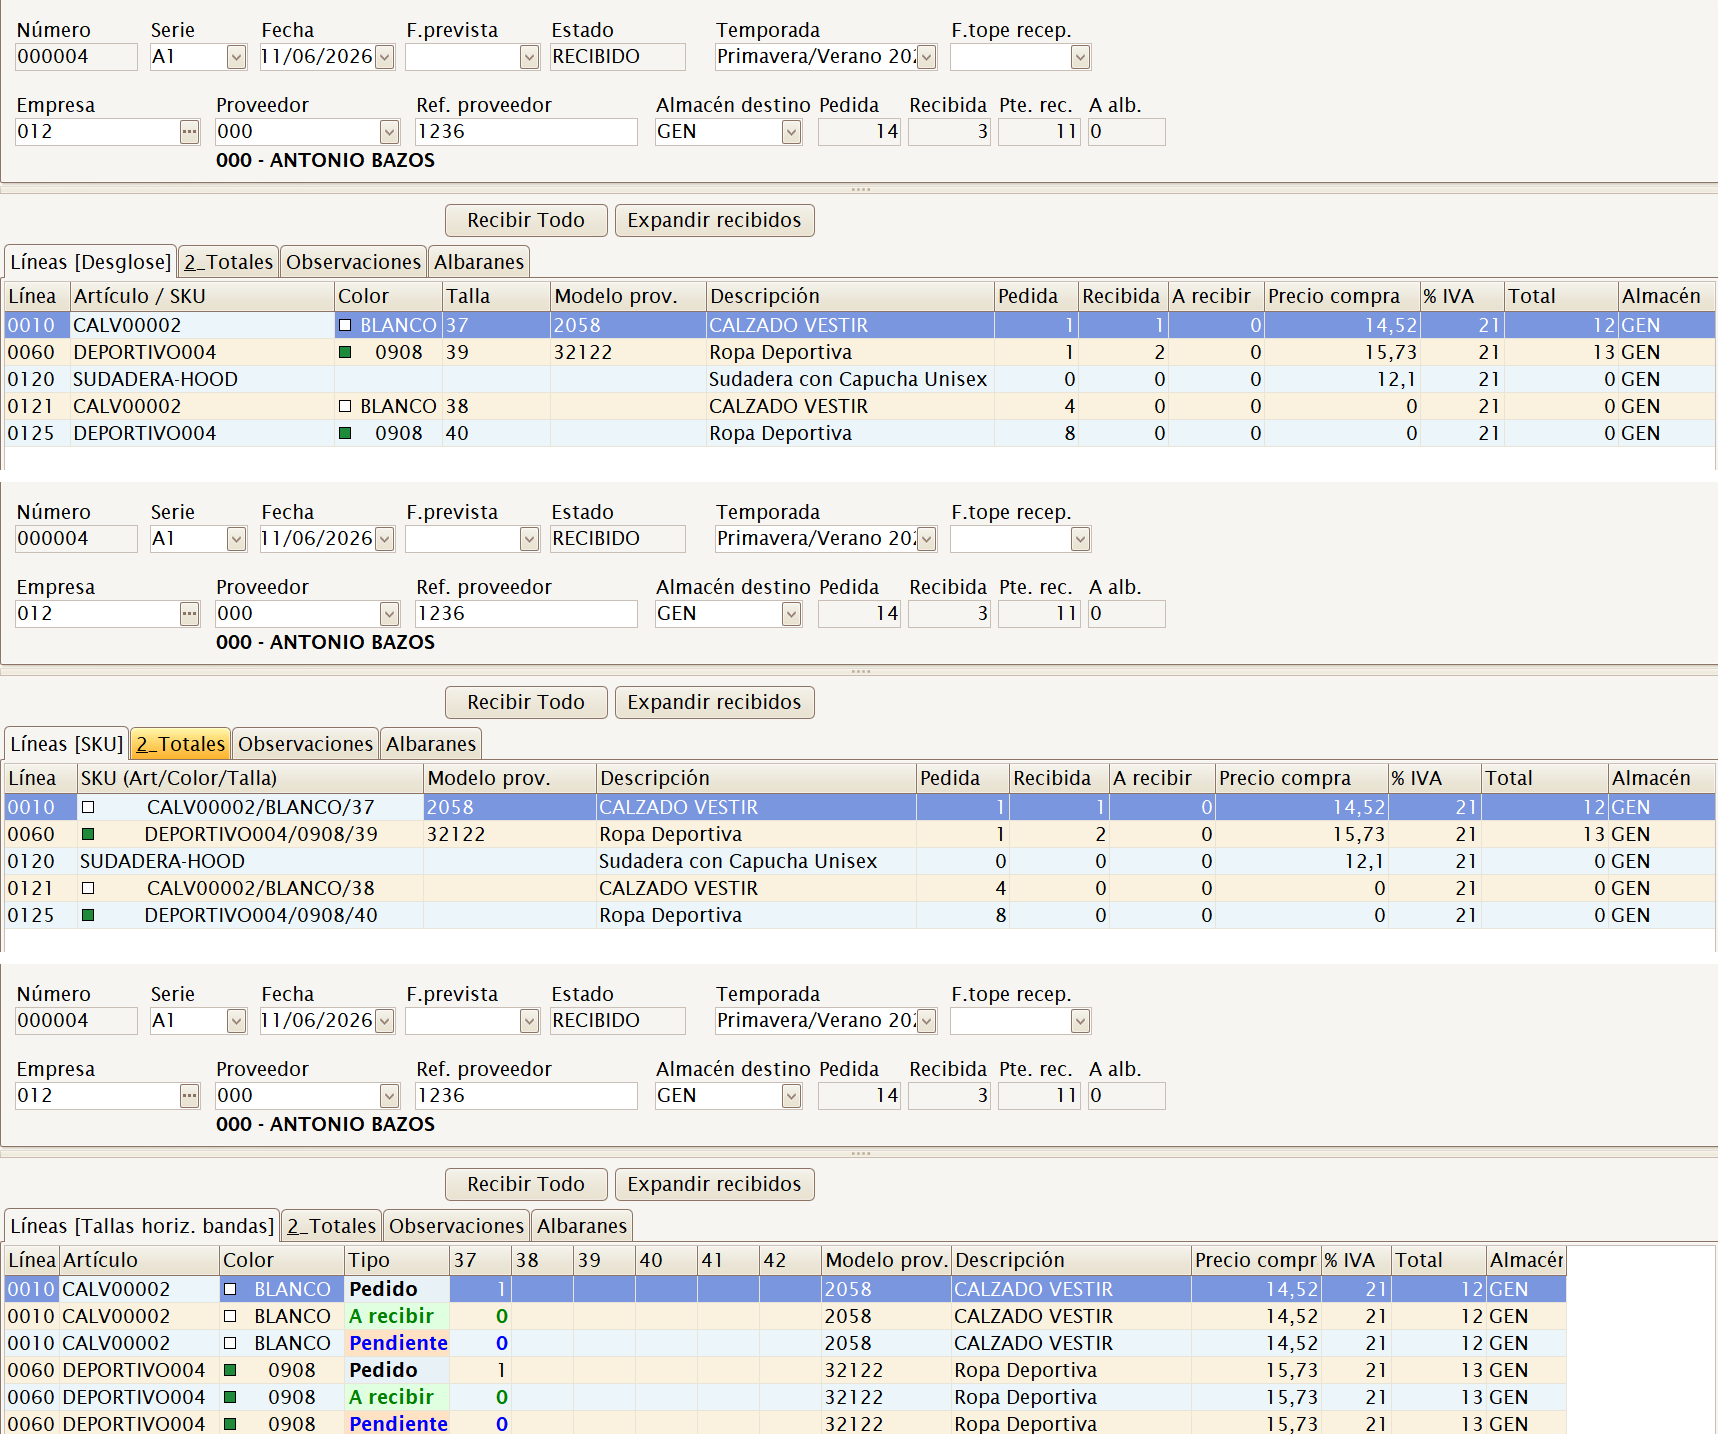
Changing the line view with F1
On the Líneas tab of compatible documents, [F1] no longer opens help: it
changes how items, SKUs and sizes are entered and viewed. Each press advances
to the next mode and returns to the first after completing the cycle. The tab
indicates the active mode.
| Mode | When it is most convenient |
|---|---|
| Auto (desglose) | Separately displays the attributes that make up the SKU, such as colour and size. |
| SKU | Lets you work directly with the variant code or its barcode. |
| Tallas en línea | Displays sizes as editable columns within the line. |
| Tallas horizontales | Groups by item/colour. On orders, it adds bands such as Pedido, A recibir/A albaranar and Pendiente. |
The cycle depends on the document:
| Document | [F1] cycle |
|---|---|
| Inventarios | Auto → SKU. |
| Albaranes de venta and Documentos de Trabajo | Auto → SKU → Tallas en línea. |
| Pedidos de compra | Auto → SKU → Tallas en línea → Tallas horizontales. |
| Pedidos y facturas de venta; albaranes, facturas y devoluciones de compra | Auto → SKU → Tallas horizontales. |
[F1] acts only while you are on Líneas and it is pressed without
[Ctrl], [Alt] or [Mayús]. It does not change quantities by itself: it
rearranges the same information to make entry and review easier. On sales
invoices it is disabled while item creation from within the invoice is
enabled. Sesiones de compra retain their own operation.
Floating item / SKU photograph
[Ctrl]+[F] opens a floating window containing the gallery of the active
item or SKU. If you switch tabs, documents or lines, the window follows the
selected record and retrieves all its images.
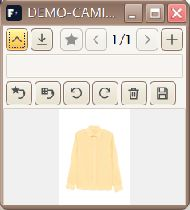
From this window you can:
- Browse several photographs with Anterior / Siguiente and check their position in the counter.
- View the photograph at 300, 600 or real resolution.
- Añadir an image to the selected item or SKU/colour level, replace the current image and mark the predeterminada image.
- Remove or rotate the selected image.
- Download photographs from the server if the installation has downloads configured under the Fotos parameter category.
An SKU without its own photograph continues to display the main image inherited from the nearest level. Marking a photograph as the default retains this compatibility in receipts, enquiries, reports and stock balances.
Photographs are stored in the folder configured in
appDirFotos. In multi-workstation installations, this should be a shared network path so that everyone sees the same images.
Item data search (Ctrl+E)
[Ctrl]+[E] opens the advanced item and SKU search from any application
window: a quick enquiry screen for locating references by any data without
leaving your current task.
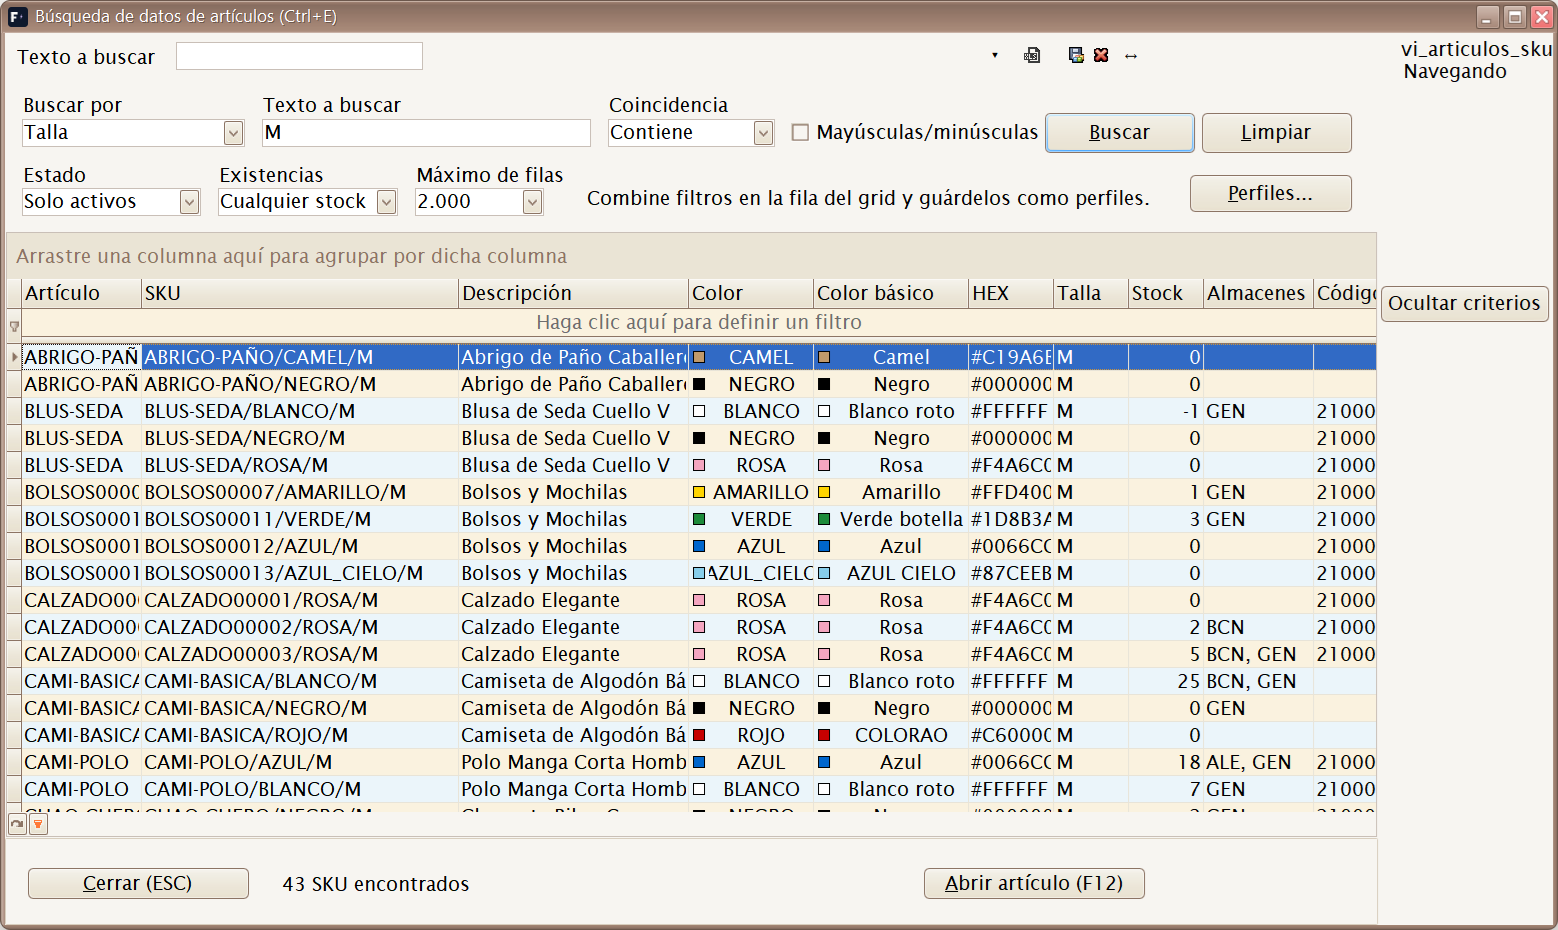 Search for size “M”: each row is an SKU, with its colour, stock and warehouses.
Search criteria:
- Buscar por — the field to search: all fields, item code, SKU, description, size, colour, barcode, family, supplier, supplier reference, season, warehouse, attributes and properties, basic colour or palette proximity (finds colours similar to the specified colour).
- Coincidencia — contains, starts with, equals, ends with or does not contain, with an option for case sensitivity.
- Estado — active only, all or inactive only.
- Existencias — any stock, with stock or without stock.
- Máximo de filas — result limit (500 / 2,000 / 5,000).
You can combine additional filters in the grid's filter row above the results and save the combination as a profile (Perfiles... button) to repeat common searches.
From the results:
- F12 or double-click — opens the selected item record.
- Añadir a Documento de Trabajo... context menu — adds the SKU to a Documento de Trabajo.
- Ocultar criterios — collapses the filter area to show more rows.
- Esc — closes the window and returns focus to the previous screen.
3. Action buttons
Independently of the navigator, screens generally display three main action
buttons. The underlined letter is the button's mnemonic ([Alt] plus that
letter):
- Grabar (
[Alt]+[G]) — saves changes to the record being edited. - Cancelar (
[Alt]+[C]) — discards unsaved changes and returns to the previous state. - Salir (
[Alt]+[S]) — closes the screen tab.
4. Workflow: creating, modifying and deleting
Creating a new record:
- Press Insertar registro,
[Insert](or the + create button). - Complete the fields on the Ficha. Required fields are normally marked or validated when saving.
- Press Grabar.
Modifying an existing record:
- Find it on the Lista and open it on the Ficha (double-click).
- Optionally, as this step can be omitted, press Editar registro or F2.
- Change what is needed and press Grabar or F12.
Deleting a record:
- Select the record.
- Press Eliminar registro and confirm, or
[Ctrl]+[Supr].
Many tables are not actually deleted; instead they are deactivated with an Activo (S/N) flag. This retains history and the integrity of old documents. When this flag exists, prefer it to deletion.
5. Searches
Screens provide two ways to search:
- Buscar BBDD — searches the whole database for the value entered in Texto a buscar. Useful for finding a record not loaded on the current page.
- Buscar Grid — searches only within data already loaded in the grid.
[Ctrl]+[A]: menu shortcut that opens the Artículos screen (just as[Ctrl]+[P]opens Proveedores and[Ctrl]+[K]opens Clientes). Every maintenance screen has its own menu shortcut; they are shown in each menu chapter and summarised under Menu shortcuts.
6. Exporting to Excel and printing
- Most lists allow the current grid contents to be exported to Excel (using the filters and visible columns at that moment).
- Documents (invoices, delivery notes, orders and so on) and reports generate printable previews (FastReport), from which they can be printed or exported to PDF.
7. Menu shortcuts
Every option on the menu bar has a keyboard shortcut that opens that screen directly from anywhere. These shortcuts are also shown alongside each option in subsequent chapters.
Archivo
| Screen | Shortcut |
|---|---|
| Empresas | [Ctrl]+[E] |
| Almacenes | [Ctrl]+[L] |
| Clientes | [Ctrl]+[K] |
| Proveedores | [Ctrl]+[P] |
| Artículos | [Ctrl]+[A] |
| Tarifas | [Ctrl]+[T] |
| Familias | [Ctrl]+[N] |
| Paises | [Ctrl]+[Alt]+[L] |
| Unidades de Medida | [Ctrl]+[Alt]+[U] |
| Propiedades | [Ctrl]+[Alt]+[Y] |
| Tipos de Variaciones | [Ctrl]+[Alt]+[T] |
| Colecciones de Atributos | [Ctrl]+[Alt]+[S] |
| Atributos básicos | [Ctrl]+[Alt]+[B] |
| Invocar login | [Shift]+[Ctrl]+[L] |
| Salir | [Alt]+[F4] |
Compras
| Screen | Shortcut |
|---|---|
| Sesiones (crear artículos y documento) | [Ctrl]+[S] |
| Pedidos | [Shift]+[Ctrl]+[P] |
| Albaranes | [Shift]+[Ctrl]+[A] |
| Borradores de compra | [Shift]+[Ctrl]+[Alt]+[F] |
| Efectos de pago | [Ctrl]+[Alt]+[C] |
Ventas Mayor
| Screen | Shortcut |
|---|---|
| Borradores | [Ctrl]+[Alt]+[F] |
| Pedidos | [Ctrl]+[Alt]+[P] |
| Albaranes | [Ctrl]+[Alt]+[A] |
| Listados de ventas | [Ctrl]+[Alt]+[V] |
Caja
| Screen | Shortcut |
|---|---|
| Menú de Caja | [F5] |
| Parámetros de Caja | [Ctrl]+[F5] |
| Formas de Pago Caja | [Shift]+[Ctrl]+[Q] |
| Depósitos de Clientes | [Ctrl]+[D] |
| Histórico de Pagos de Caja | [Shift]+[Ctrl]+[J] |
| Histórico de Vales | [Shift]+[Ctrl]+[V] |
| Histórico de Operaciones | [Shift]+[Ctrl]+[O] |
| Histórico de Arqueos | [Shift]+[Ctrl]+[H] |
| Borradores Simplificados | [Shift]+[Ctrl]+[F] |
Almacén
| Screen | Shortcut |
|---|---|
| Movimientos de almacén | [Ctrl]+[M] |
| Inventarios | [Ctrl]+[Alt]+[I] |
Otros
| Screen | Shortcut |
|---|---|
| Parámetros del entorno | [Ctrl]+[F10] |
| Grupos de IVA | [Ctrl]+[O] |
| Impuesto IVA | [Ctrl]+[I] |
| Contadores | [Ctrl]+[R] |
| Formas de pago documentos | [Shift]+[Ctrl]+[G] |
| Usuarios | [Ctrl]+[H] |
| Empleados | [Ctrl]+[Alt]+[E] |
| Grupos | [Ctrl]+[J] |
| Perfiles | [Ctrl]+[W] |
| Permisos | [Ctrl]+[Q] |
| Hacer Copia de Seguridad | [Ctrl]+[Y] |
| Recuperar Copia de Seguridad | [Ctrl]+[Z] |
| Generador de Procesos | [Ctrl]+[G] |
8. Audit fields
Every record automatically stores who created or last modified it, and when (creation/modification time and user). You do not complete these fields: the application manages them automatically. They are useful for traceability and support.